Specimen Referral Network Vehicle Route Optimization - Final Results, Lesotho
Specimen Referral Network Vehicle Route Optimization - Final Results, Lesotho
Executive Summary
Optimize specimen collection and delivery using SpatialXL and RouteXL
Network Coverage
- 194 of 317 facilities (61%) currently linked to 18 testing locations across Lesotho
- 38 locations have TB/HIV/COVID testing equipment; 15 hubs serve dual collection and testing roles
Tier 1 Optimization (Collection Point to Hub)
- Optimized baseline eliminates once-weekly pickups with 54 motorcycles (same fleet); annual distance reduced to 1,104,887 km
- Scenario 1 raises minimum frequency to 3x/week with 57 motorcycles; max specimen-to-hub time drops from 7 to 3 days
Tier 2 Optimization (Hub to NRL)
- Current single-vehicle baseline requires 20.5-hour shifts and is likely unsustainable
- Scenario 1 scales to 5 vehicles with 2x/week frequency for all 15 hubs; max time to NRL reduced from 7 to 4 days
Key Recommendations
- Implement optimized Tier 1 baseline immediately (no additional resources needed)
- Scale Tier 2 from 1 to 5 vehicles for reliable 2x/week service; overall max TAT reduced from 16 to ~7 days
Specimen Referral Network Analysis
- Work with specimen referral transport provider, Riders for Health
- Optimize existing routes
- Explore scenarios for improving access and/or timeliness
Process
- Updated master facility list (MFL) and diagnostic services
- Map out current (baseline) network, including Riders for Health transport schedules/routes
- Perform route optimization on baseline scenario
- Discuss further scenarios for route optimization
- Perform route optimization on other scenarios
- Cost analysis of various transport scenarios
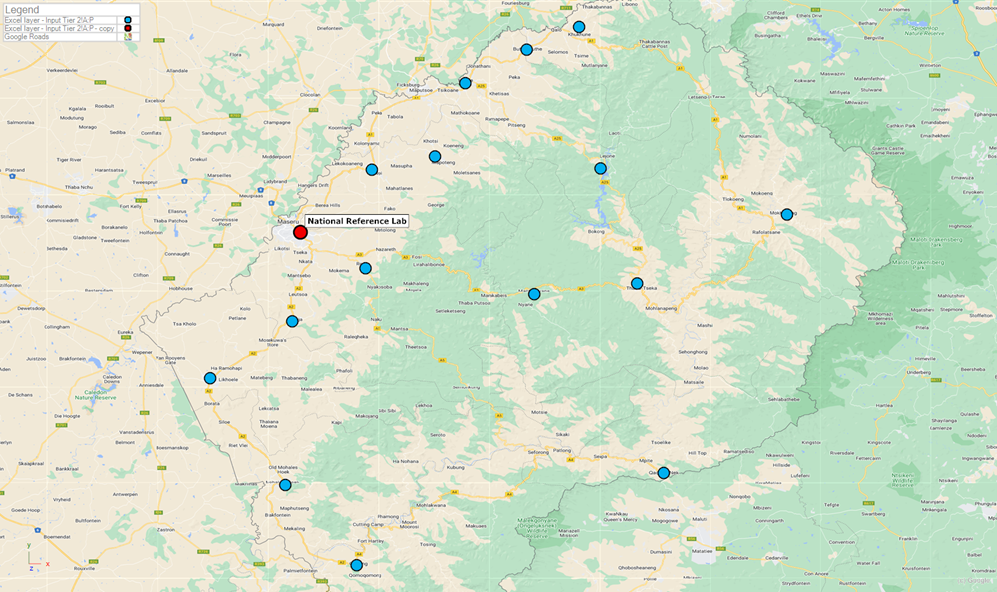
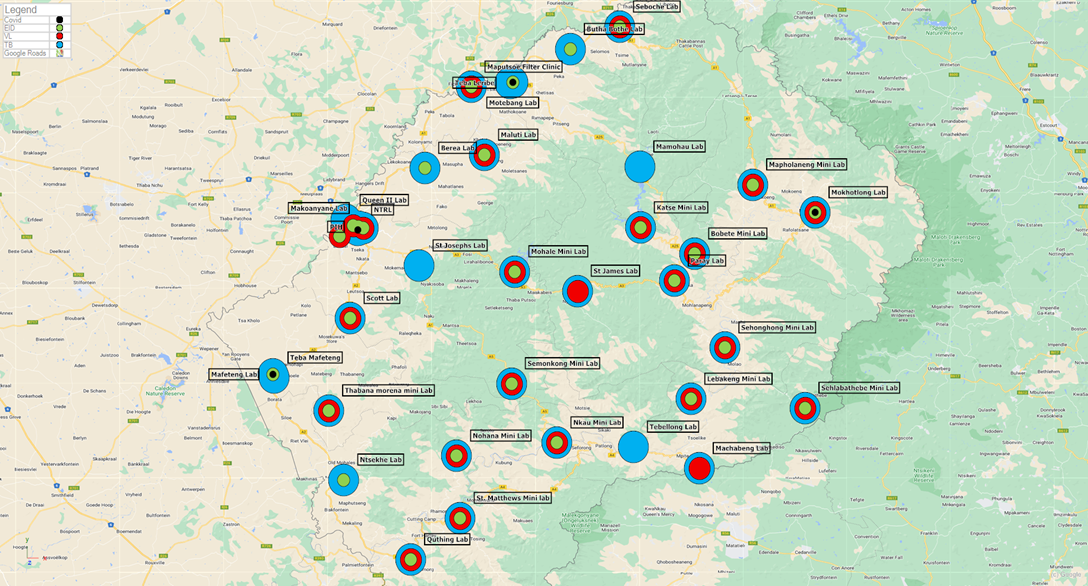
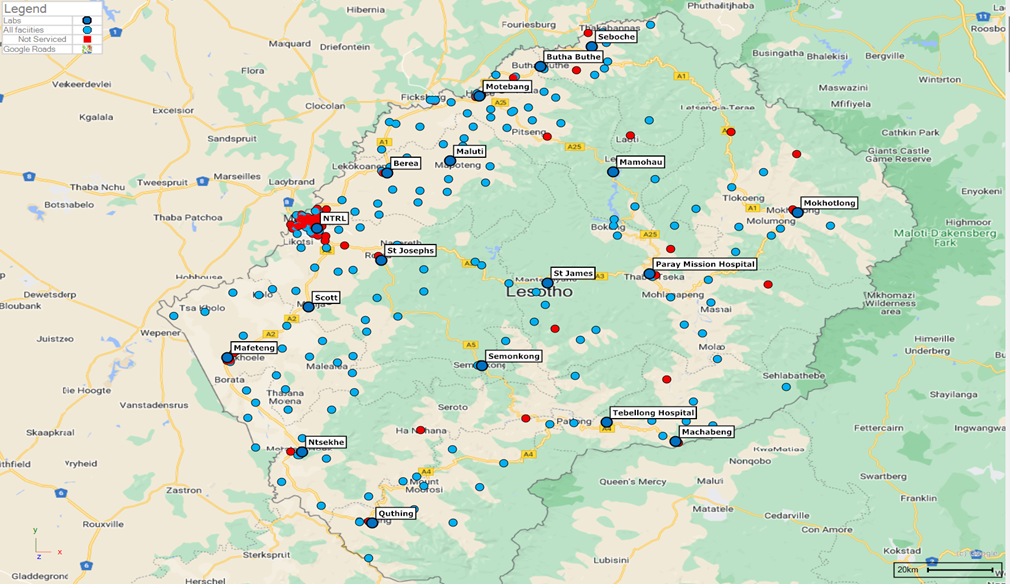
Diagnostic Network: Current Situation
Diagnostic Network Overview
- 317 facilities originally on Master Facility List (provided by Riders)
- Of these 194 (61%) were linked to one of 18 testing locations (17 + NRL)
- 15 testing locations also act as hubs - receive specimens for testing onsite and refer specimens for testing offsite
- 38 locations have testing equipment for TB/HIV/COVID (labs, mini labs, filter clinics, health centers and partner-run facilities)
- MTB/RIF - GeneXpert
- HIV EID/VL - GeneXpert, mPima (VL only), Roche C4800 (VL only), Roche 6800, Hologic Panther
- COVID-19 - GeneXpert
- Majority of 38 locations do not receive specimens from offsite locations via Riders for testing
Specimen Referral System
- Specimen referral system (SRS) provided by Riders
- Riders provides pickup from primary collection points and delivery to hubs (Tier 1) via motorcycle
- Riders picks up from hubs and delivery to NRL (Tier 2) via four-wheeled vehicle
Explanation of Timeliness
Transport Time is a Small Element of Overall TAT - Tier 1
| Component | Duration |
|---|---|
| Specimen delivery (transit) | Same-day |
| Result delivery (transit) | Same-day |
| Lab (analytical) time | 2 days |
| Waiting at HC (specimen) | Same-day to 4/7 days |
| Waiting at hub (result) | Same-day to 4/7 days |
Does not account for any expedited results' return (i.e. electronic, phone, etc.)
Tier 1 TAT Explained
- Routes can all be done same-day, anywhere from 1-5x per week frequencies of pickups at baseline
- Minimum TAT is same-day (1 day) for all scenarios - specimen is picked up and delivered to the hub the same day
- Maximum TAT:
- 4 days with twice a week pick-up
- 7 days with once a week pick-up
Example: Once a week
- Minimum (1 day): Specimen is taken on a Wednesday before transport leaves. It goes to the Hub and arrives the same day.
- Maximum (7 days): Specimen taken on a Friday (after transport leaves). Next pick up day is Friday (once a week) and it will arrive on the same Friday. So Friday-Friday = 7 days.
Example: Twice a week
- Minimum (1 day): Specimen is taken on a Wednesday before transport leaves. It goes to the Hub and arrives the same day.
- Maximum (4 days): Specimen taken on a Friday (after transport leaves). Next pick up day is Tuesday (twice a week) and it will arrive on the same Tuesday. So Friday-Tuesday = 4 days.
Tier 1: Collection Point to Hub
Baseline Scenario
- 194 facilities linked to one of 17 hubs and/or NRL
- 54 motorcycles and riders are used in the current schedule - all based at hubs
- Some of these motorcycles also do inter-district transport for referrals to VL testing (outside of NRL)
- Frequencies of tier 1 referrals - once per week to daily
- Total shift times are mostly under 5.5 hours to allow the bikes to visit facilities between 10 am and 2 pm, but can be higher due to allocation to hub and distance travelled
- Most riders do not reach their first destination before 10 am and return back to their base by 5 pm, even with a slightly higher shift time
Baseline Frequencies
| Number of HFs | Frequency of pickups |
|---|---|
| 6 | 1x per week |
| 64 | 2x per week |
| 69 | 3x per week |
| 23 | 4x per week |
| 18 | 5x per week |
Optimized Baseline Scenario
- Frequencies of tier 1 referrals - changed to minimum twice per week to daily
- Only affected 6 collection points that were only receiving once weekly pick ups at baseline
- 53 motorcycles and riders would be needed for the optimized baseline
Optimized Baseline Frequencies
| Number of HFs | Frequency of pickups |
|---|---|
| 0 | 1x per week |
| 64 | 2x per week |
| 77 | 3x per week |
| 14 | 4x per week |
| 31 | 5x per week |
Scenario 1: Increase Frequency of Pick Ups
- Frequencies of tier 1 referrals - changed to minimum 3x per week to daily
- Increased frequency of pick ups for 64 collection points that were receiving twice per week visits
- 57 motorcycles and riders would be needed for Scenario 1
Scenario 1 Frequencies
| Number of HFs | Frequency of pickups |
|---|---|
| 0 | 1x per week |
| 0 | 2x per week |
| 141 | 3x per week |
| 14 | 4x per week |
| 31 | 5x per week |
Summary of Max Overall TAT - Tier 1
| Tier 1 | Wait for pick up (specimens) | Transit time (Specimens) | Specimen TAT | Lab/Analysis Time | Wait for pick up (Results) | Transit time (Results) | Results TAT | Total TAT |
|---|---|---|---|---|---|---|---|---|
| Baseline | 7 days | Same-day | 7 days | 2 days | 7 days | Same-day | 7 days | 16 days |
Tier 1 sample TAT from when the sample is collected from a patient to when it is delivered to the hub is 7 days max when frequency of transport/pick-ups are only once per week (baseline and baseline plus scenarios) but decreases to 4 days max when frequencies are 2x/wk.
Tier 1 - Summary of Scenarios
| Scenario Tier 1 | Collection Points | Hubs | Tier 1 Linkages | Bike Location | Tier 1 Frequency | Tier 1 Transport |
|---|---|---|---|---|---|---|
| Baseline | 194 from Riders schedule (out of 317 total on MFL) | 17 Hubs plus NRL | From Riders schedule | 18 from Riders schedule (all at hubs including NRL) | Once per week to daily | 54 motorcycles |
| Optimized Baseline | Same as baseline | Same as baseline | Same as baseline | Same as baseline | Twice per week to daily | 54 motorcycles |
| Scenario 1 (increased frequencies) | Same as baseline | Same as baseline | Same as baseline | Same as baseline | 3x per week to daily | 57 motorcycles |
Tier 1 - Summary Metrics
| Tier 1 | Points routed | Hubs & bike location | Annual Distance (kms)* | Bikes Used | Max shift (transit time) | Max time to hub** |
|---|---|---|---|---|---|---|
| Baseline | 184 | 18 | 1,144,924 | 54 | 7 hours | 7 days |
| Optimized Baseline | 186 | 18 | 1,104,887 | 54 | 8 hours | 4 days |
| Scenario 1 | 186 | 18 | 1,458,657 | 57 | 8 hours | 3 days |
Assume 50 working weeks per year. Maximum time for specimen collected at a collection point to reach the hub given frequency of pickups. Annual numbers include inter-district travel done by some motorcycles for referral of VL.
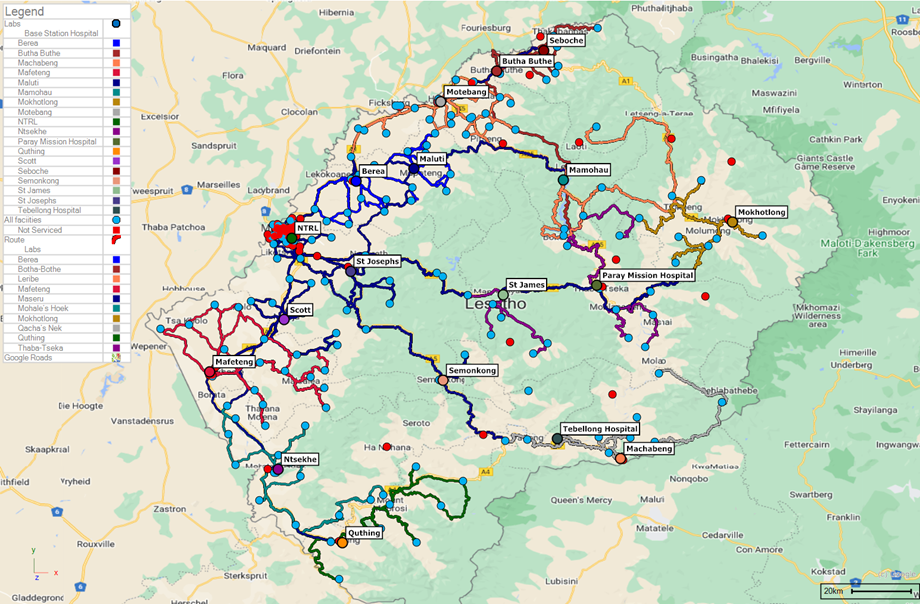
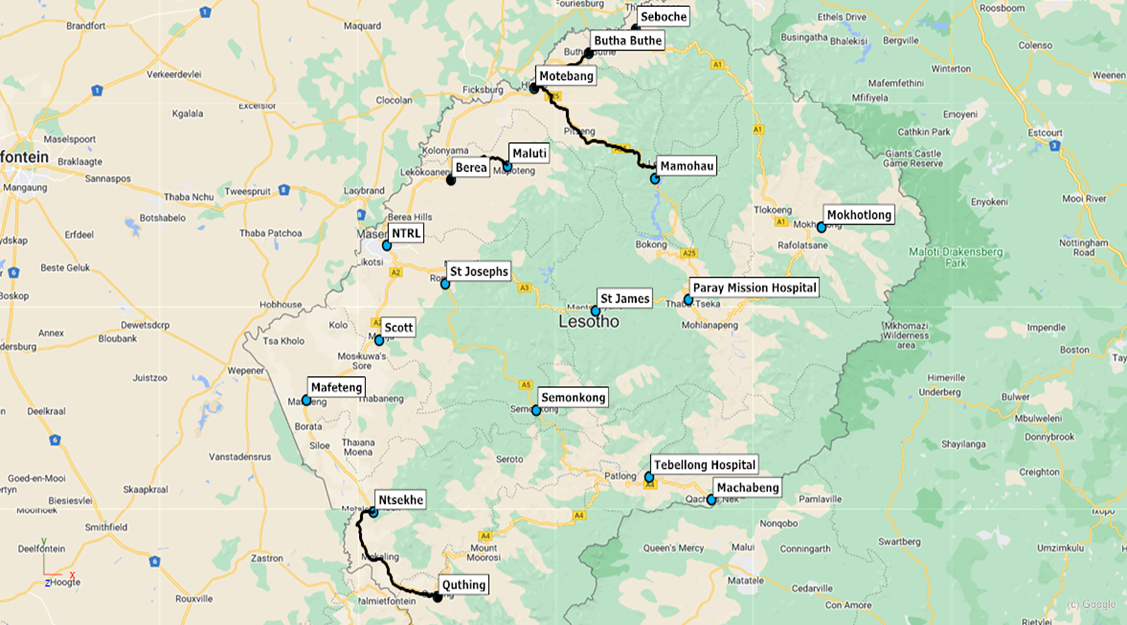
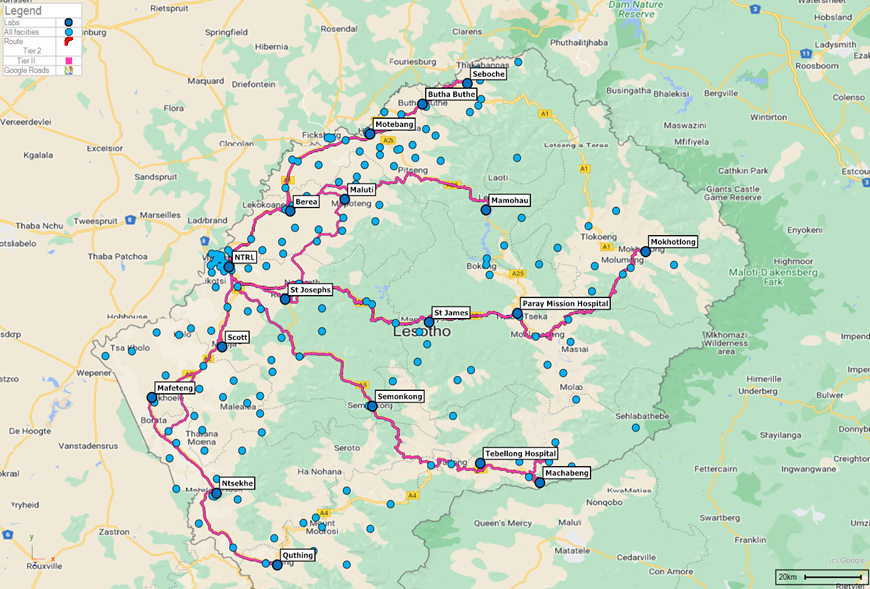
Tier 2: Hub to Regional/NRL
What is the Optimal Design for Tier 2 Referrals?
- Tier 1 transport connects collection points with hubs
- Hubs have GeneXpert for TB testing, possibly HIV VL/EID testing
- Further referrals are required from the hub to:
- HIV PCR labs at regional/national level (7 labs) (for hubs without VL/EID capacity)
- TB reference labs (1 lab at NTRL, next door to HIV PCR lab)
- Decided not to route from all Xpert locations (total 38 - not only the hubs) to the NTRL
- For TB specimens for c/DST at NRL, they will travel via hubs to NTRL
Baseline Scenario
- 15 hubs (district hospitals) have pickups with delivery to NRL
- 1 vehicle in the current schedule - based at Riders office in Maseru
- Frequencies of tier 2 referrals - once or twice per week (one route is done 2x)
- If we assume 90 minutes wait time in between points, a 20h 30min shift time would be required 4 days/week to achieve schedule
- 79 hours total time, of which 49 hours are driving time
- Would total 2,360 km per week
- Seems unlikely that the baseline schedule is covered by one vehicle every week
Baseline Coverage (# of labs served)
| District | Laboratory | Tier 2 Coverage |
|---|---|---|
| Butha Buthe | Butha Bothe Lab | Yes |
| Leribe | Motebang Lab | Yes |
| Mamohau Lab | Yes | |
| Seboche Lab | Yes | |
| Berea | Berea Lab | Yes |
| Maluti Lab | Yes | |
| Maseru | NRL | Yes (delivery point) |
| Makoanyane Lab | No | |
| Scott Lab | Yes | |
| St Josephs Lab | Yes | |
| Mafeteng | Mafeteng Lab | Yes |
| Mohales Hoek | Ntsekhe Lab | Yes |
| Quthing | Quthing Lab | Yes |
| Qachas Nek | Machabeng Lab | Yes |
| Tebellong Lab | No | |
| Thaba Tseka | Paray Lab | Yes |
| St James Lab | Yes | |
| Mokhotlong | Mokhotlong Lab | Yes |
Baseline Frequencies
| Number of collection points | Frequency of pickups |
|---|---|
| 10 | 1x per week |
| 5 | 2x per week |
Scenario 1: Increase Frequency of Pick Ups
- Frequencies of Tier 2 referrals - increased so each is twice per week
- 5 vehicles and drivers would be needed - all based at the main NRL
- Total shift times are mostly over 2 days to allow for the distances covered
Scenario 1 Frequencies
| Number of collection points | Frequency of pickups |
|---|---|
| 0 | 1x per week |
| 15 | 2x per week |
Tier 2 - Summary of Scenarios
| Scenario Tier 2 | Collection Points | Testing Labs | Tier 2 Linkages | Tier 2 Transport | Vehicle Location | Tier 2 Frequency |
|---|---|---|---|---|---|---|
| Baseline (all samples routed together) | 15 hubs, all with Xpert | NRL/NTRL | Hubs to NRL | 1 vehicle | Riders-Maseru | 1-2x weekly |
| Baseline (intra-hub transport for VL testing) | 4 hubs, all with Xpert | Other hubs | Intra-hub | Motorcycles (part of Tier 1 routing) | 4 hubs | - |
| Scenario 1 (increased frequencies) | Same as baseline | Same as baseline | Same as baseline | 5 vehicles | Same as baseline | 2x weekly |
Tier 2 - Summary Metrics
| Tier 2 | Points routed | Destinations & vehicle location | Annual Distance (kms)* | Vehicles Used | Max shift (transit time) | Max time to NRL** |
|---|---|---|---|---|---|---|
| Baseline (vehicle only) | 15 | 1 | 122,706 | 1 | 20.5 hours | 7 days |
| Scenario 1 | 15 | 1 | 236,954 | 5 | 15 hours | 4 days |
Assume 50 working weeks per year. Maximum time for specimen collected at a collection point to reach the NRL given frequency of pickups.